Are you thinking of selling on Amazon? Whether you’re an established business or an individual looking to start a side hustle, setting up an Amazon Seller account is your first step toward tapping into the largest e-commerce platform in the world. In this guide, we’ll walk you through every step, ensuring a smooth setup so you can begin selling quickly and confidently.
1. Choose the Right Seller Plan
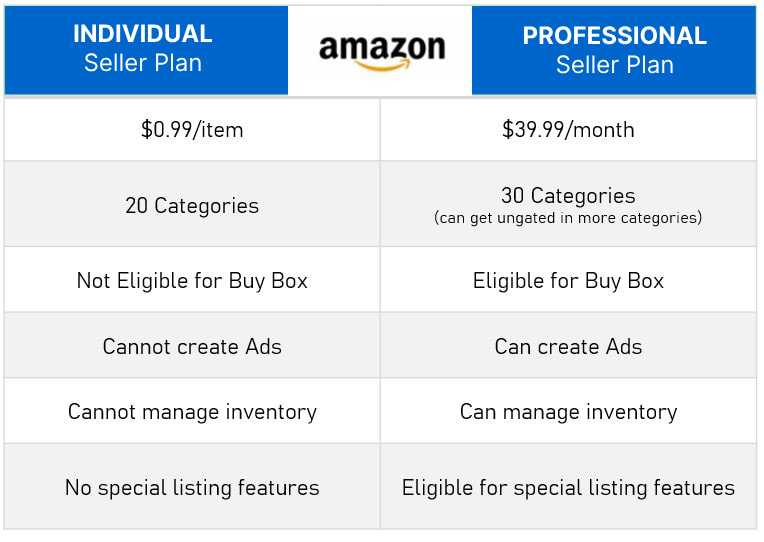
Amazon offers two main types of selling plans:
- Individual Plan: This plan costs $0.99 per item sold, plus other fees. It’s ideal if you’re planning to sell fewer than 40 items per month.
- Professional Plan: For $39.99 per month, plus other fees, this plan is suited for sellers who expect to sell more than 40 items monthly. It also gives you access to advanced tools like advertising and reports.

2. Gather the Necessary Information
Before signing up, make sure you have the following information ready:
- Business Address: A valid business or personal address.
- Email Address: You’ll use this to log in and communicate with Amazon.
- Credit Card: A chargeable credit card for monthly fees and other expenses.
- Tax Information: Depending on your country, Amazon will require either a tax ID (for businesses) or a Social Security Number (for individuals).
- Phone Number: Amazon will use this for account verification

3. Create Your Seller Account
Visit the Amazon Seller Central homepage and click on “Sign Up.”
- Select Your Plan: Choose either the Individual or Professional plan based on your selling goals.
- Enter Your Information: Follow the prompts to input your business details, tax information, and bank account for receiving payments.
Once you’ve submitted everything, Amazon will verify your information and let you know when your account is ready to go!
4. Set Up Your Seller Profile
Your seller profile is like your storefront on Amazon. Be sure to:
- Choose a Professional Display Name: Make sure your display name represents your brand well.
- Add a Logo: If you have a logo, upload it to help with brand recognition.
- Fill Out the “About” Section: Provide a short, engaging description of your business. Focus on your unique selling points and why customers should trust you.
Once you’ve submitted everything, Amazon will verify your information and let you know when your account is ready to go!

5. List Your First Product
After your account is active, it’s time to list your first product:
- Choose a Professional Display Name: Make sure your display name represents your brand well.
- Product Title: Craft a concise, keyword-rich title to attract customers.
- Product Images: Amazon requires high-quality images, preferably on a white background, that show your product clearly.
- Bullet Points and Description: Highlight key features in the bullet points, followed by a detailed description.

6. Set Your Pricing and Shipping Options
When pricing your product, consider both your cost and Amazon’s fees (referral fees, FBA fees, etc.). You can also offer free shipping to boost conversions or use Amazon’s Fulfillment by Amazon (FBA) service for shipping, storage, and customer service.
7. Comply with Amazon’s Policies
Amazon has strict guidelines and policies for sellers. Some key ones to be aware of include:
- Prohibited Products: Ensure that your products don’t fall under Amazon’s restricted categories.
- Customer Service: If you’re not using FBA, you’ll need to handle customer service and returns promptly.
- Product Authenticity: Amazon takes counterfeit products seriously. Always sell genuine items.
Conclusion: You’re Ready to Sell!
Setting up your first Amazon Seller account is straightforward, especially when you follow these steps. Once your account is set, focus on optimizing your listings, managing inventory, and growing your brand on Amazon’s vast marketplace. Good luck!
